Wednesday, December 23, 2015

The bluetooth disruption

Well... As I needed some lighting at "Lantern Garden" I bought two 12 V/10W LED projectors and assembled them in the rural field, though I had a problem, where do I put the light switch? And what about rain? It will be ruined very soon... And humidity in the area is quite heavy, so I decided another way, but it needed planing and more hard-work!
At left you can see the light pole and water-resistant distribution box with the projectors assembled (they already have some corrosion because of humidity...).
My decision was to use a bluetooth device I bought for quite sometime now, and to increase the area covered by the signal I put a small waterproof box about 20 meters from the main box, as I need to light up outside the area and not inside it, otherwise I would enter the field without light.
The picture on the right has the bluetooth device already connected and about to be closed inside his "home". For getting it to work I assembled an arduino (wich gave me a huge headache with the resonators I bought, they simply didn't work!) which interprets the bluetooth signals and transfers it to digital/analog pins, at the moment it only lights the projectors, but.. the sky is the limit!
To drive the 12V/10W LEDs I used a TIP120, and it works fine as you can see on the picture on the right and the bluetooth signal gets quite far, I'd say.


Thursday, June 4, 2015

Wateringduino (the end)

This post is intended to celebrate the full production of wateringduino, which is logging and working with 3 watering circuits 365/24/7.
As it is important to have an idea and execute it correctly, more important it is to finish a project! Job's done! Cheers!

Thursday, April 23, 2015

Well volume measurement - Theory (Part I)

Hi there! My post today is more theory than practice, but this is also needed.
When I thought of making a weather station, one of the items I wanted to acquire is the well water volume that I have, this way I can study the water dynamics and learn something about it and its use.
To do it there are mostly 3 ways:
- Ultra-sound device pointing to the water, acquiring the water level.
- Pressure measurement device on the bottom of the well, enclosed in a waterproof box with some membrane allowing the inside of the camera to increase/decrease pressure, measuring the water weight.
- Pressure measurement device on top of the well, enclosed in a tube, filled with the corresponding water level, measuring the water column.
Knowing the depth of the well and the diameter of the rings we can calculate the volume of water using the formula:
V = π radius2 height

The first option is expensive regarding good waterproof ultra-sound sensors, the second has the water-proof design flaw, which is difficult do go around, so I aimed for the third option, which uses a physical principle that can be consulted here and here.
Basically it's something like:
A sense tube is connected to the pressure sensor which resides on top of the water column. The tube goes all the way down to the bottom with an opening near the down end, forcing water to go into the tube. When the liquid fills the well, it also fills the tube till the same height. The trapped air in the tube is compressed, being measured by the sensor on the top of the column. The increase in pressure is proportional to the depth.
Regarding my case, and taking consideration of this: 0.1 meter H2O (conventional) = 98.0665 pascal, and knowing that I have a 7.8 meters depth well, a totally full well would return 7649.187 pascal, an empty one would return something like ambient pressure (on top of the well) minus 7.8 meters depth (easy huh?). The mentioned value allows us the use of a 0.1 meter resolution (used as resolution base value) which means an amount of about 31,4 litters up or down.

Wednesday, April 8, 2015

Agentuino

Quite a while ago I bought an ethernet shield for my arduino, and since then I wanted to use it on my weather station. You may ask why, first it has an integrated microSD shield, and secondly you can use it by issuing SNMP commands to set/get variables and create, afterwards, RRD graphics. The complicated part was to get a compliant library to manage decently the SNMP commands, I didn't find what I wanted, so... I changed the source code to make it happen!
I used the agentuino library, lots of info here: agentuino
The changes I made will not work with the "old" Agentuino.h, as it is incapable of dealing with FLOAT and to set values other than strings, so, you can use my changed library, replacing the old Agentuino.h file with this one. Using it you can manage to do some simple testing like setting an LED on/off, or even fading it (if using a PWM port) this simple examples can be taken to other levels, and you may use your network connection to automatically or manually setting the house-lighting on/off or fade it, start/stop the loan watering (it can be automatic using a crontab command, for instance) among other things you may remember may be useful.
The code I developed is available here and I called it weatherduino because it's intended to be used in the weather station, but you can call it whatever you like and use it freely as long as you link the original work to this page. At the time I'm expanding it to support the arduino MEGA.

Sun tracker - part I

A couple of weeks ago I got some new (used) batteries for my solar station, as you can see on the picture on the right. If they were new, I'd have something like 36 Ah, but they where on heavy duty, so I'll be happy with a humble 20 Ah. Nevertheless it came to me that if my solar panel was equipped with a solar tracker I'd increase the power production in something like 20/40% , having a more profitable battery bank. FYI the most important tracker is the E-W axis, the N-S can be almost neglected and it'll be suffice having an arm setting position for Summer, Autumn/Spring and Winter times.
For the tracker motor control I bought a couple of H-bridges, in this case the L293D, described in the bottom picture:
The chip deals with 600mA max current, tolerates peaks of 1.2A. It uses 5V for regular working, except for pin 8 which should feed the needed motor voltage (in this case I'll use 12V), needless to say that the GND pin from the 12V power-source should be connected to the GND pin of the 5V power-source.  I must say that the electronics part is quite easy to achieve, the difficult part is to manage to create a cheap and robust mechanical system, I disassembled an old HP deskjet printer and used the tray motor, it uses 19V nominal, 24V max, quite good to use in this project with 12V, it drains only 150mA of current (I measured 200mA, 400/450mA if holding the wheel). I'm now assembling it and will have pictures soon! The electronics and programming will be showed up also at that time.
The L293D truth table:

Weather Station - part I, sensor shield

Hi! I've been away for some time, but still doing things, just not publishing them as regularly as I would like to...
Well, but getting back to work , using some vase plates, of good plastic (they do not break when drilled) I managed to create a sensor shield, using 7 small plates, 2 bigger plates, 3 spacers like the ones on the right image and 3 screwed bars of 15 cm each. Drilled a big hole in the middle for a plastic tube on 6 of the small plates, leaving the big ones untouched  and on of the small ones. The objective is to create an insulated, rain free area inside the plates.
So, I have plastic plates, which the sun will possibly warm up during summer, but they are spaced allowing the air to flow and the sensors are inside an acrylic tube which is made of a rather different material preventing the warming up/cooling of the inside, hence, better isolation.
You can see on the left an almost finished view with a large plate, some small plates, a spacer and the acrylic tube. The finished piece is downside. It'll be painted on a more neutral color, like white or pale grey (I have a bottle of paint spray with this color, so why not use it? :D ).
The next step is to seal the upper and bottom holes with mosquito net, to assure I don't get unwanted guests inside, and then I'll wire cable from the arduino Mega box (possibly CAT5e which I have lots of spare meters) to connect the 2 (planned) sensors inside, a BMP085 barometric pressure and a HIH-4030 humidity/temperature sensor.
Afterwards I'll need another shield like this one for the luminosity sensor (hasn't arrived yet). A piezo will also be used to detect the rain intensity. The wind vane and anemometer will use a different housing.

Cheers!


Sunday, March 29, 2015

Wateringduino (again)

Though I have posts about wateringduino, I haven't show it on the field, so, here it is:
On top-right I have the TIP120 power circuit to drive the solenoid open/closed when strawberries dry, you can't drive the solenoid directly, it works on 12V, arduino uses 5V and the current it drains (about 800 mA) would blow up the ship even if it used 5V. On the left there's the RTC (Real-Time clock) which supplies the date/time for the logging purposes, with this I know exactly at what time it waters the strawberries and allows a more advanced logger (spreadsheet graphics allowed), as we saw in a previous post. The SD label is an SD shield with a 32 Mb (yes, it's more then enough, and I have to recycle things) microSD card in which the .csv data files are recorded. The "brain" is the arduino circuit, homemade as it gets cheaper than using a bought board, it has (as previous posts refer) 3 circuits only one is working now, just because the other 2 solenoids haven't arrived yet, it will water the trees and blueberries/raspberries/blackberries very soon. The item marked as power-source is as it is, a power-source, which receives 12V DC and generates 2 outputs, one of 5V for arduino and stuff and one of 3.3V for the SD card. IMPORTANT: never try to drive SD cards with 5V, you'll blow them up!
On the left, is a picture of the homemade probe which measures the moist in the soil, the pic was taken a couple weeks ago and the berries are quite bigger now. I must say that the dry-up problem they had last year no longer happens!
I'll get back to this as soon as I get the ordered solenoids, and I'll post the code also, which has changed since the last time, namely the .csv file format as I realized that the old format wasn't graphic friendly, it needed a lot of hammering to get it compliant with the needs.

Cheers!

Wednesday, March 18, 2015

Arduino ISP shield

Hi there! I finally managed to get the ISP shield on tracks, here you have some pictures, I just need some fresh ATmega328 to use it! :)

Initial circuit and pieces
Piezo soldered
Piezo and Leds in place
On top of the main board, quite nice ah?..
Downside, a little messy, but better hidden than at sight!!!

Tuesday, March 17, 2015

Nano drivers

Well... I bought a Chine Nano, and it turned out to be a replica with a ch340g cheap chip, I followed these guidelines after some hours trying to install updated arduino drivers with no success, hope this will help those who read this...

Thursday, March 12, 2015

Dallas DS1820

Well... I needed to use a long cable to acquire a couple of temperatures and I was having problems with the readings. The specs say that long cables can be used (something like 300 meters) and several devices, BUT reading some more I found out that these are supposed to have repeaters along the way. Nevertheless I found this information which I quote:
For short cable runs, unscreened two- or three-core cable, or single-core (parasite mode) or twin-core (normal mode) screened audio cable should be suitable. For longer cable runs, low capacitance cable such as rf aerial downlead (parasite mode) has been successfully used over a distance of 10 m. CAT 5 network cable has also been used with success over a distance of 30m, with data & ground using one twisted pair and power & ground using a second twisted pair. 
 I managed to put the DS1820 working with some cheating, and not using these recommendations, instead of the shielded cable and stuff, I used a pull-up resistor of 2000 Ohms, instead of the 4k7 which is usually recommended/used. It works, maybe the resolution is not the best, but in fact I'm not using all the cable I tested so, it's a cheaper way of doing what I wanted. The large distance was achieved in parasite mode, in regular mode the results would be even better.

Back to wateringduino!!

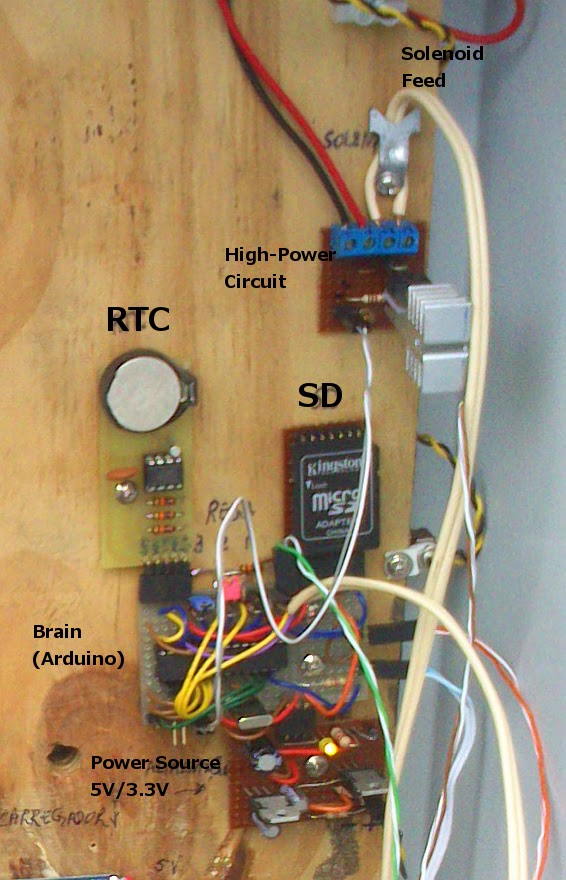
Well... The Summer is coming, we're almost at Spring time and I bought a solenoid and finally got the wateringduino on the field. This year I'll have fantastic strawberries I can assure!
I made some changes to the project, and I'm still adapting it to the needs I have, so, let's see:

- Circuit 1; Watering the strawberries based on data collected by the probe. I found out that it works fine but there's an adjustment needed to guarantee that the moist level doesn't change so drastically during daytime with the temperature change.
- Circuit 2; I intend to improve and change this circuit to water the raspberries and blueberries during daytime within the most warm hours in two small periods of time (4 minutes only), once before 12:00 and another afterwards, to keep the roots slightly wet but not too wet. A probe will not be used, I'll use the RTC instead to do the job.
- Circuit 3; Is to be changed, not using probes, using the RTC instead, as in circuit 2 but in this case watering the trees daily for 20 minutes, probably a couple hours before sunrise.

I leave some graphs I got from the SD logger that wateringduino has implemented.
The first one (on the left) is a temperature graph of an underground probe, about 0.5 meter beneath soil surface.

The second one (on the right side) is the moist values the system got, and as you can see it needs some adjustment because the moist values don't change that much during daytime, so, what's happening is that conductivity changes with the heat, and as the strawberry "vase" is hanged at about 1 meter height, it get's warmer with the sun rays during daytime, hence, the voltage gets higher within warmer conditions. The corrective formula (there are also corrective tables, but the application of an equation is easier to do) is this one:
I haven't decided yet if I'm going to use it, after all it's extra hard-work as a tradeoff of cleaner data, so... Nevertheless it means that the electric conductivity at 25 Celsius is equal to the obtained electric conductivity multiplied by an exponential factor which has the soil temperature within it, aimed to balance the data.
The orange spikes concern the moments that the system starts watering.
As you can see the system is working fine and I have now nicely wet strawberries! Cheers!

Friday, January 9, 2015

HC-06 Bluetooth module with arduino.

Hi there! This is a short document/code to remind me what I have done with a HC-06 Bluetooth module and an arduino as it's not easy to collect the information I got here, it took me sometime.
Firstly, the module can be AT controlled and set some of the parameters as long as it's not paired with a device, so, we must first set the parameters and only afterwards play with devices. The password/pin of the device and name are not lost upon power off.
The AT available commands are:
- AT -> OK (shows status) 
- AT+VERSION -> OKlinvorV1.8 (shows firmware version)
- AT+NAMEARDUINO -> OKsetname (sets broadcast name to 'ARDUINO', kept after powerdown)
- AT+PIN1303 -> OKsetPIN (sets PIN to '1303', kept after powerdown)
- AT+BAUD4 -> OK9600 (sets the baudrate @9600,
   1---------1200
   2---------2400
   3---------4800
   4---------9600
   5---------19200
   6---------38400
   7---------57600
   8---------115200 ) 

Now, knowing this, let's PLAY!! ;)

// HC-06 Possible commands, HC-05 are different!
// ATTENTION!!! THESE COMMANDS WORK ONLY IF THE BLUETOOH IS
// NOT PAIRED WITH ANY DEVICE:
// «AT Mode: Before paired, it is at AT mode.
// After paired it’s at transparent communication.»
// (case sensitive commands)
// AT -> OK (shows status)
// AT+VERSION -> OKlinvorV1.8 (shows firmware version)
// AT+NAMEARDUINO -> OKsetname (sets broadcast name to
//   'ARDUINO', kept after powerdown)
// AT+PIN1303 -> OKsetPIN (sets PIN to '1303', kept
//   after powerdown)
// AT+BAUD4 -> OK9600 (sets the baudrate @9600,
//   1---------1200
//   2---------2400
//   3---------4800
//   4---------9600
//   5---------19200
//   6---------38400
//   7---------57600
//   8---------115200 )

#include <SoftwareSerial.h>

SoftwareSerial BTSerial(10, 11); // RX, TX

void setup() 
{
  // Open serial communications and wait for port to open:
  Serial.begin(9600);
  BTSerial.begin(9600);
  Serial.println("Enter your AT command:");
}

void loop() // run over and over
{
  if (BTSerial.available())
    Serial.write(BTSerial.read());
  if (Serial.available())
    BTSerial.write(Serial.read());
}

Friday, January 2, 2015

The TIP120 Arduino shield

  This article is about a homemade Arduino shield, using a TIP120. The TIP120 is a darlington transistor that works as an electronic switch, it can handle large power, such as 60 Volt, 5 Amp (for high power you should use an aluminum cooler). This approach has some advantages over a relay circuit, and some disadvantages too, as you all can imagine, one of the disadvantages is the use of 110/220V circuitry as the TIP only works with 60V, on the other hand you can use PWM on it, it is faster than a mechanic switch as the relay and I imagine it consumes lower power on switching than the relay.
I used the circuit on the right (which I found somewhere over the internet) to build a schematic as you can see on the image at the
right to build afterwards an Arduino shield.


At the top of the image we see the TIP and the Arduino connection, the Arduino signal (that can be a regular digital output with an on/off behavior, or a PWM digital output to provide dimming on a lamp/LED or motor) and the GND provided by the Arduino board. On the lower end of the schematic we have 2 board connectors, one for connecting the load with the polarity showed (the polarity is only important on devices which have one, in case of a DC motor the TIP is protected by a diode 1N4007 or similar) and the other to connect the power. The 1 k Ohm resistor should be replaced by a 4k7 because of ground fluctuations.
The final result can be seen in the pictures.


NOTE: Has been registered a situation where the input control pin had a fluctuating voltage and the load and power were connected leading the TIP to a ON false situation, a workaround could be increase the resistor value or ground the control pin. Not tested yet.