Hi there! This is a short document/code to remind me what I have done with a HC-06 Bluetooth module and an arduino as it's not easy to collect the information I got here, it took me sometime.
Firstly, the module can be AT controlled and set some of the parameters as long as it's not paired with a device, so, we must first set the parameters and only afterwards play with devices. The password/pin of the device and name are not lost upon power off.
The AT available commands are:
- AT -> OK (shows status)
- AT+VERSION -> OKlinvorV1.8 (shows firmware version)
- AT+NAMEARDUINO -> OKsetname (sets broadcast name to 'ARDUINO', kept after powerdown)
- AT+PIN1303 -> OKsetPIN (sets PIN to '1303', kept after powerdown)
- AT+BAUD4 -> OK9600 (sets the baudrate @9600,
1---------1200
2---------2400
3---------4800
4---------9600
5---------19200
6---------38400
7---------57600
8---------115200 )
Now, knowing this, let's PLAY!! ;)
// HC-06 Possible commands, HC-05 are different!
// ATTENTION!!! THESE COMMANDS WORK ONLY IF THE BLUETOOH IS
// NOT PAIRED WITH ANY DEVICE:
// «AT Mode: Before paired, it is at AT mode.
// After paired it’s at transparent communication.»
// (case sensitive commands)
// AT -> OK (shows status)
// AT+VERSION -> OKlinvorV1.8 (shows firmware version)
// AT+NAMEARDUINO -> OKsetname (sets broadcast name to
// 'ARDUINO', kept after powerdown)
// AT+PIN1303 -> OKsetPIN (sets PIN to '1303', kept
// after powerdown)
// AT+BAUD4 -> OK9600 (sets the baudrate @9600,
// 1---------1200
// 2---------2400
// 3---------4800
// 4---------9600
// 5---------19200
// 6---------38400
// 7---------57600
// 8---------115200 )
#include <SoftwareSerial.h>
SoftwareSerial BTSerial(10, 11); // RX, TX
void setup()
{
// Open serial communications and wait for port to open:
Serial.begin(9600);
BTSerial.begin(9600);
Serial.println("Enter your AT command:");
}
void loop() // run over and over
{
if (BTSerial.available())
Serial.write(BTSerial.read());
if (Serial.available())
BTSerial.write(Serial.read());
}
Friday, January 9, 2015
Friday, January 2, 2015
The TIP120 Arduino shield
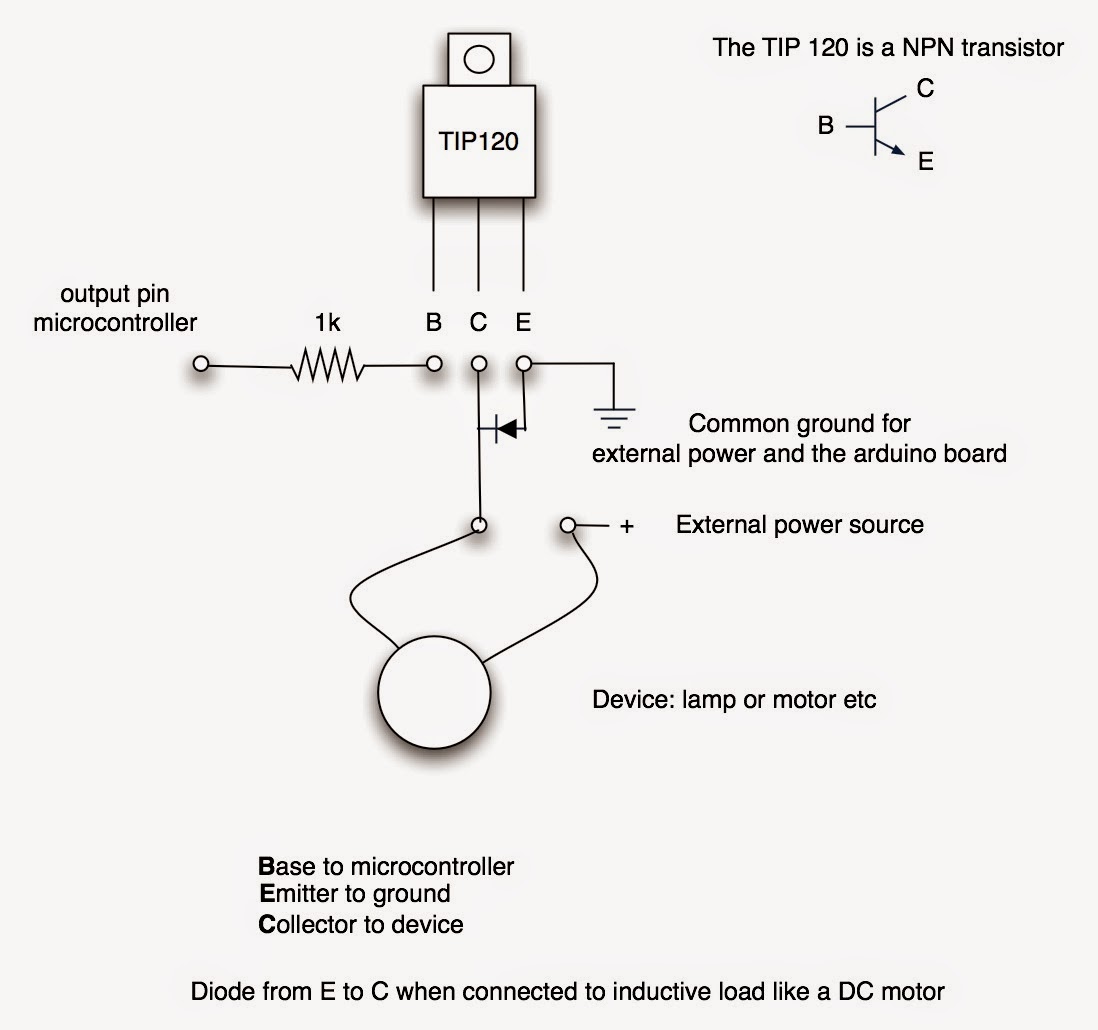
This article is about a homemade Arduino shield, using a TIP120. The TIP120 is a darlington transistor that works as an electronic switch, it can handle large power, such as 60 Volt, 5 Amp (for high power you should use an aluminum cooler). This approach has some advantages over a relay circuit, and some disadvantages too, as you all can imagine, one of the disadvantages is the use of 110/220V circuitry as the TIP only works with 60V, on the other hand you can use PWM on it, it is faster than a mechanic switch as the relay and I imagine it consumes lower power on switching than the relay.
 I used the circuit on the right (which I found somewhere over the internet) to build a schematic as you can see on the image at the
right to build afterwards an Arduino shield.


At the top of the image we see the TIP and the Arduino connection, the Arduino signal (that can be a regular digital output with an on/off behavior, or a PWM digital output to provide dimming on a lamp/LED or motor) and the GND provided by the Arduino board. On the lower end of the schematic we have 2 board connectors, one for connecting the load with the polarity showed (the polarity is only important on devices which have one, in case of a DC motor the TIP is protected by a diode 1N4007 or similar) and the other to connect the power. The 1 k Ohm resistor should be replaced by a 4k7 because of ground fluctuations.
The final result can be seen in the pictures.
NOTE: Has been registered a situation where the input control pin had a fluctuating voltage and the load and power were connected leading the TIP to a ON false situation, a workaround could be increase the resistor value or ground the control pin. Not tested yet.
 I used the circuit on the right (which I found somewhere over the internet) to build a schematic as you can see on the image at the
right to build afterwards an Arduino shield.


At the top of the image we see the TIP and the Arduino connection, the Arduino signal (that can be a regular digital output with an on/off behavior, or a PWM digital output to provide dimming on a lamp/LED or motor) and the GND provided by the Arduino board. On the lower end of the schematic we have 2 board connectors, one for connecting the load with the polarity showed (the polarity is only important on devices which have one, in case of a DC motor the TIP is protected by a diode 1N4007 or similar) and the other to connect the power. The 1 k Ohm resistor should be replaced by a 4k7 because of ground fluctuations.
The final result can be seen in the pictures.
NOTE: Has been registered a situation where the input control pin had a fluctuating voltage and the load and power were connected leading the TIP to a ON false situation, a workaround could be increase the resistor value or ground the control pin. Not tested yet.
Subscribe to:
Posts (Atom)

